
If you’re a designer or working on user interface development, you’re likely familiar with Figma, a powerful design tool that simplifies the creative process. One skill that can greatly enhance your design capabilities is the ability to crop shapes effectively within Figma. Whether you’re just starting or a seasoned pro, this comprehensive guide will walk you through cropping shapes in Figma to create visually appealing project designs.
Table of Contents
| Introduction to Figma’s Shape Cropping |
| The Significance of Shape Cropping |
| Getting Started with Figma |
| Choosing and removing shapes |
| The Crop Tool: Unveiling its Magic |
| Cropping a Rectangle |
| Cropping a Circle |
| Cropping Custom Shapes |
| Fine-Tuning and Adjustments |
| Layer Order Matters |
| Using Masks for Advanced Cropping |
| Using Masks for advanced Cropping |
| Tips for Efficient Workflow |
Introduction to Figma’s Shape Cropping

Figma offers various features that empower designers to create visually appealing designs. Among these, shape cropping plays a crucial role in enhancing the aesthetics of your designs.
The Significance of Shape Cropping

Imagine a canvas filled with elements vying for attention. Cropping steps in as a design savior, allowing you to focus on specific components selectively. You create a visual hierarchy by isolating parts of an image or object, driving your audience’s gaze to the most important aspects. This technique is pivotal in enhancing storytelling and visual communication
Getting Started with Figma
Before delving into shape cropping, ensure you are well-acquainted with Figma’s interface. If Figma is a novelty to you, contemplate commencing a fresh project or accessing an existing one to hone your cropping abilities.
Choosing and removing shapes
To initiate cropping a shape, your initial step involves selecting the specific shape. Simply click on the shape you intend to manipulate to highlight it. Remember that you can also click outside the shape to remove the selection.

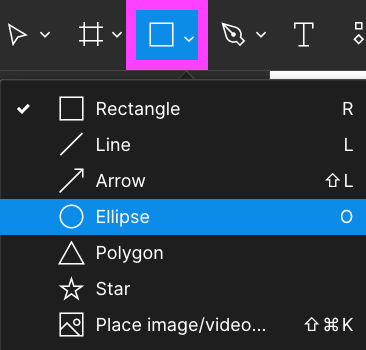
The Crop Tool: Unveiling its Magic
Locate the Crop tool in the toolbar. This tool lets you define the area you want to keep while cropping out the rest.

Cropping a Rectangle
Cropping a rectangle is quite straightforward. After selecting the rectangle, click on the Crop tool. You’ll see handles on the edges of the shape. Adjust these handles to define the area you want to keep visible. Once satisfied, press the Enter key to complete the cropping process.
Cropping a Circle
Cropping a circle follows a comparable process to cropping a rectangle. Begin by choosing the circle shape and click on the crop tool. Adjust the handles to encompass the portion of the circle you want to keep, and press Enter to finalize the cropping.
Cropping Custom Shapes
The Crop tool remains your go-to option for more complex shapes, like polygons. Figma’s intuitive interface makes it simple to crop even irregular shapes.
Fine-Tuning and Adjustments
After cropping, use the corner handles to fine-tune the cropped area. You can also reposition the cropped shape by clicking and dragging it.
Layer Order Matters
In Figma, layer order impacts cropping. Ensure the shape you want to crop is placed above the shape you intend to crop it with.
Incorporating Cropped Shapes into Designs
Drag the cropped shape onto your design canvas. Resize and reposition it as needed to integrate it into your project seamlessly.
Using Masks for Advanced Cropping
For more intricate designs, consider using masks in combination with cropping. Masks offer greater flexibility in revealing specific parts of an image.
Tips for Efficient Workflow
- Keyboard Shortcuts: Use keyboard shortcuts to expedite the cropping process.
- Experimentation: Try different cropping angles for creative effects.
- Undo Functionality: Don’t hesitate to use the “Undo” feature if unsatisfied with a cropping result.
Final note
Becoming proficient in shaping cropping within Figma can revolutionize how designers work. By eliminating distractions and emphasizing focal points, you’ll create visually engaging and impactful designs. So, whether you’re working on a web design, app interface, or any other graphical project, remember that effective shape cropping can make a difference.
FAQs (Frequently Asked Questions)
Q1: Can I crop images in Figma?
You can crop both shapes and images in Figma using the Crop tool.
Q2: Are cropped shapes editable after the cropping process?
Absolutely. Cropped shapes remain fully editable, allowing you to make adjustments whenever needed.
Q3: Is there a way to crop a shape into a custom form?
Figma’s Crop tool is versatile enough to handle cropping for various shapes, including custom forms.
Q4: Can I animate cropped shapes in Figma?
You can apply animations to cropped shapes to create dynamic and engaging designs.
Q5. Does Figma support golden ratio cropping?
While Figma doesn’t offer an automated golden ratio tool, you can certainly apply the golden ratio manually to your crop boundaries for enhanced aesthetics.
Q6. Is it Possible to Crop Images in Figma Without Compromising Image Quality?
Indeed, Figma offers non-destructive techniques like using the Mask, Edit Object, and Crop tools. These methods ensure that the original image remains unchanged. When exporting a cropped image, select the suitable file format and settings to uphold the quality of the image.
See more:
Figma: Collaborative Design in the Cloud for Creative Excellence.